The main problem that occurs with 3rd party devices or hardware, as updated drivers provided by Windows seems to more often break things rather than fix it. So without wasting any time, let’s see how to Stop Automatic Driver Downloads on Windows 10 with the help of the below-listed guide.
Stop Automatic Driver Downloads on Windows 10
Make sure to create a restore point, just in case something goes wrong.
Stop Automatic Driver Downloads on Windows 10 Method 1: Disable Automatic Driver Updates Method 2: Using Windows Update Show/Hide Troubleshooter Method 3: Disable Automatic Device Driver Update via Registry Method 4: Stop Automatic Driver Downloads Using Group Policy Editor
Method 1: Disable Automatic Driver Updates
Press Windows Key + R then type sysdm.cpl and hit enter to open Advanced System Settings.
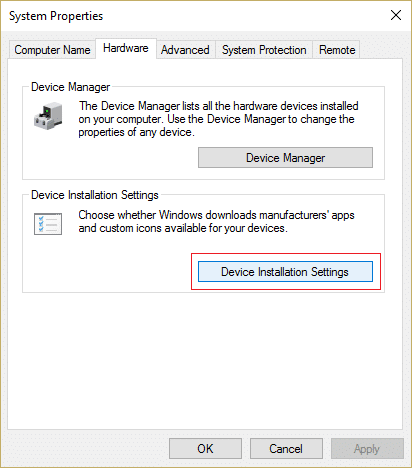
Switch to Hardware tab and then click on Device Installation Settings.
Select “No (your device might not work as expected)” and click Save Changes.
Again, Click Apply, followed by OK.
Method 2: Using Windows Update Show/Hide Troubleshooter
Press Windows Key + R then type devmgmt.msc and hit Enter.
Right-click on the problematic device and select Uninstall.
Checkmark the box “Delete the driver software for this device.”
Press Windows Key + R then type appwiz.cpl and hit Enter.
From the left-hand menu, select View installed updates.
To uninstall the unwanted updated, right-click on it and then select Uninstall. 7.Now in order to prevent the driver or update being reinstalled, download them and run the “Show or hide updates” troubleshooter.
Follow the instructions within the troubleshooter, and then select to hide the problematic driver.
Reboot your PC to save changes then see if you’re able to Stop Automatic Driver Downloads on Windows 10, if not then try the next method.
Method 3: Disable Automatic Device Driver Update via Registry
Press Windows Key + R then type regedit and hit Enter to open Registry Editor.
Navigate to the following registry key: HKEY_LOCAL_MACHINE\SOFTWARE\Microsoft\Windows\CurrentVersion\DriverSearching
Now select DriverSearching then in the right window pane double-click on SearchOrderConfig.
Change it’s the value from the Value data field to 0 and clicks OK. This will turn off Automatic Updates.
Reboot your PC to save changes and see if you’re able to Stop Automatic Driver Downloads on Windows 10.
Method 4: Stop Automatic Driver Downloads Using Group Policy Editor
Note: This method will not work for Windows Home Edition Users.
Press Windows Key + R then type gpedit.msc and hit Enter to open Group Policy Editor.
Navigate to the following path: Computer Configuration > Administrative Templates > System > Device Installation > Device Installation Restrictions
Select Device Installation then in the right window pane double-click on “Prevent Installation of Devices not described by other policy settings.”
Checkmark enabled then click Apply followed by OK.
Reboot your PC to save changes. Recommended:
How to Show File Extensions in Windows 10 How to Fix Computer turns off automatically Change Default Folder View of Search Results on Windows 10 How To Fix Windows 10 Turns ON by itself
That’s it you have successfully Stop Automatic Driver Downloads on Windows 10 but if you still have any questions regarding this post then feel free to ask them in the comment’s section.


