Change the listening port for Remote Desktop
Make sure to create a restore point just in case something goes wrong. 1.Press Windows Key + R then type regedit and hit Enter to open Registry Editor.
2.Navigate to the following registry key:
HKEY_LOCAL_MACHINE\System\CurrentControlSet\Control\TerminalServer\WinStations\RDP-Tcp
3.Now make sure you have highlighted RDP-Tcp in the left pane then in the right pane look for the subkey “PortNumber.“
4.Once you have found PortNumber then double-click on it to change its value. Make sure to select Decimal under Base to see the edit its value.
5.You should see the default value (3389) but in order to change it’s value type a new port number between 1025 and 65535, and click OK. 6.Now, whenever you try to connect to you home PC (for which you changed the port number) using Remote Desktop Connection, make sure to type in the new port number. Note: You may also need to change the firewall configuration in order to allow the new port number before you can connect to this computer using Remote Desktop Connection. 7.To check the result run cmd with administrative rights and type: netstat -a Add a custom inbound rule to allow the port through the Windows Firewall 1.Press Windows Key + X then select Control Panel.
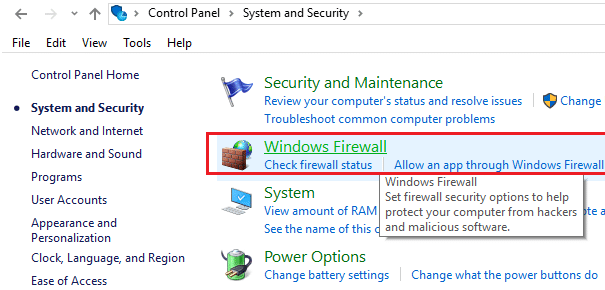
2.Now navigate to System and Security > Windows Firewall.
3.Select Advanced Settings from the left-hand side menu. 4.Now select Inbound Rules on the left.
5.Go to Action then click on New Rule. 6.Select Port and click Next.
7.Next, select TCP (or UDP) and Specific local ports, and then specify the port number which you want to allow connection for.
8.Select Allow the connection in the next window.
9.Select the options which you need from Domain, Private, Public (private and public are the network types that you select when you connect to the new network, and Windows ask you to select the network type, and the domain is obviously your domain).
10.Finally, write a Name and Description in the window that shows next. Click Finish. Recommended for you:
Fix Internet Explorer cannot display the webpage error Restore TrustedInstaller as File Owner in Windows Fix Windows 10 Brightness Settings Not Working 5 ways to fix Windows has detected an IP address conflict
That’s it you have successfully learned How to Change the listening port for Remote Desktop if you still have any queries regarding this post feel free to ask them in the comment’s section.


